


 Introduction Of The "Php"
If you want to learn the basics of PHP, then you've come to
the right place. The goal of this tutorial is to teach you the basics of PHP so
that you can:
- Customize PHP scripts that you download, so that they better fit your needs.
- Begin to understand the working model of PHP, so you may begin to design your own PHP projects.
- Give you a solid base in PHP, so as to make you more valuable in the eyes of future employers.
PHP - What is it?
Taken directly from PHP's home, PHP.net, "PHP is an
HTML-embedded scripting language. Much of its syntax is borrowed from C, Java
and Perl with a couple of unique PHP-specific features thrown in. The goal of
the language is to allow web developers to write dynamically generated pages
quickly."
This is generally a good definition
of PHP. However, it does contain a lot of terms you may not be used to. Another
way to think of PHP is a powerful, behind the scenes scripting language that
your visitors won't see!
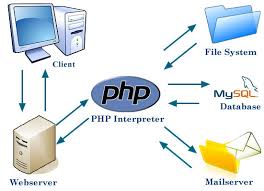
When someone visits your PHP
webpage, your web server processes the PHP code. It then sees which parts it
needs to show to visitors(content and pictures) and hides the other stuff(file
operations, math calculations, etc.) then translates your PHP into HTML. After
the translation into HTML, it sends the webpage to your visitor's web browser.
PHP - What's it do?
It is also helpful to think of PHP
in terms of what it can do for you. PHP will allow you to:
- Reduce the time to create large websites.
- Create a customized user experience for visitors based on information that you have gathered from them.
- Open up thousands of possibilities for online tools. Check out PHP - HotScripts for examples of the great things that are possible with PHP.
- Allow creation of shopping carts for e-commerce websites.
What You Should Know
Before starting this tutorial it is
important that you have a basic understanding and experience in the following:
- HTML - Know the syntax and especially HTML Forms.
- Basic programming knowledge - This isn't required, but if you have any traditional programming experience it will make learning PHP a great deal easier.
Tutorial Overview
This tutorial is aimed at the PHP
novice and will teach you PHP from the ground up. If you want a drive-through
PHP tutorial this probably is not the right tutorial for you.
Remember, you should not try to plow
through this tutorial in one sitting. Read a couple lessons, take a break, then
do some more after the information has had some time to sink in.
PHP - Necessary Setup
To begin working with PHP you must first have access to either of the following:- A web hosting account that supports the use of PHP web pages and grants you access to MySQL databases. If you do not have a host, but are interested in signing up for one, we recommend that you first read our Web Host Guide to educate yourself about web hosting and avoid getting ripped off.
- Have PHP and MySQL installed on your own computer. Read this lesson thorougly for more information on installing PHP.
Although MySQL is not absolutely
necessary to use PHP, MySQL and PHP are wonderful complements to one another
and some topics covered in this tutorial will require that you have MySQL
access.
Installing PHP
For those who are experienced enough
to do this yourself, simply head over to PHP.net - Downloads
and download the most recent version of PHP.
However, if you are like most of us,
you will most likely want to follow a guide to installing PHP onto your
computer. These guides are kindly provided by PHP.net based on the operating
system that you are using.
- PHP - Windows - Windows Installation Guide
- PHP - Mac - Mac Installation Guide
- PHP - Linux - Linux Installation Guide
Installing MySQL
As we mentioned before, MySQL is not
a requirement to use PHP, however they often go hand in hand.
PHP - Syntax
Before we talk about PHP's syntax, let us first define what syntax is referring to.- Syntax - The rules that must be followed to write properly structured code.
PHP Code:
<?php
?>
or the shorthand PHP tag that requires shorthand support to be enabled
on your server...
<?
?>If you are writing PHP scripts and plan on distributing them, we suggest that you use the standard form (which includes the ?php) rather than the shorthand form. This will ensure that your scripts will work, even when running on other servers with different settings.
How to Save Your PHP Pages
If you have PHP inserted into your HTML and want the web browser to interpret it correctly, then you must save the file with a .php extension, instead of the standard .html extension. So be sure to check that you are saving your files correctly. Instead of index.html, it should be index.php if there is PHP code in the file.Example Simple HTML & PHP Page
Below is an example of one of the easiest PHP and HTML page that you can create and still follow web standards.PHP and HTML Code:
<html>
<head>
<title>My First PHP Page</title>
</head>
<body>
<?php
echo "Hello World!";
?>
</body>
</html>
Display:
Hello World!
If you save this file (e.g. helloworld.php) and place it on PHP enabled
server and load it up in your web browser, then you should see "Hello
World!" displayed. If not, please check that you followed our example
correctly.We used the PHP command echo to write "Hello World!" and we will be talking in greater depth about how echo is special later on in this tutorial.
The Semicolon!
As you may or may not have noticed in the above example, there was a semicolon after the line of PHP code. The semicolon signifies the end of a PHP statement and should never be forgotten. For example, if we repeated our "Hello World!" code several times, then we would need to place a semicolon at the end of each statement.PHP and HTML Code:
<html>
<head>
<title>My First PHP Page</title>
</head>
<body>
<?php
echo "Hello World! ";
echo "Hello World! ";
echo "Hello World! ";
echo "Hello World! ";
echo "Hello World! ";
?>
</body>
</html>
Display:
Hello World! Hello World! Hello World! Hello World! Hello
World!
In PHP the fopen function is used to open files. However, it can also create a file if it does not find the file specified in the function call. So if you use fopen on a file that does not exist, it will create it, given that you open the file for writing or appending (more on this later).
Since we want to create a file, we must supply a file name and tell PHP that we want to write to the file. Note: We have to tell PHP we are writing to the file, otherwise it will not create a new file.
In the near future Tizag.com will have a more in-depth tutorial on how to use CHMOD to set file permissions.
A file pointer is PHP's way of remembering its location in a file. When you open a file for reading, the file pointer begins at the start of the file. This makes sense because you will usually be reading data from the front of the file.
However, when you open a file for appending, the file pointer is at the end of the file, as you most likely will be appending data at the end of the file. When you use reading or writing functions they begin at the location specified by the file pointer.
If you wanted to write a new file, or overwrite an existing file, then you would want to open the file with the "w" option. This would wipe clean all existing data within the file.
If you wanted to add the latest order to your "orders.txt" file, then you would want to open it to append the data on to the end. This would be the "a" option.
After a file has been closed down with fclose it is impossible to read, write or append to that file unless it is once more opened up with the fopen function.
Below we are writing a couple of names into our test file testFile.txt and separating them with a carriaged return.
We wrote to the file testFile.txt twice. Each time we wrote to the file we sent the string $stringData that first contained Bobby Bopper and second contained Tracy Tanner. After we finished writing we closed the file using the fclose function.
If you were to open the testFile.txt file in NOTEPAD it would look like this:
One character is equal to one byte. If you wanted to read the first five characters then you would use five as the integer.
If you wanted to read all the data from the file, then you need to get the size of the file. The filesize function returns the length of a file, in bytes, which is just what we need! The filesize function requires the name of the file that is to be sized up.
Lucky for us our "testFile.txt" file is separated by new lines and we can utilize this function.
Now it's time to learn how to destroy (delete) files. In PHP you delete files by calling the unlink function.
If you unlink a file, you are effectively causing the system to forget about it or delete it!
Before you can delete (unlink) a file, you must first be sure that it is not open in your program. Use the fclose function to close down an open file.
The contents of the file testFile.txt would now look like this:
A log is basically used to document events that occur over a period of time, rather than all at once. Logs: a perfect use for append!
The $_FILES array is where PHP stores all the information about files. There are two elements of this array that we will need to understand for this example.
We now have all we need to successfully save our file to the server. $target_path contains the path where we want to save our file to.
If there was a problem then the error message "There was an error uploading the file, please try again!" would be displayed.
These few lines of code we have given you will allow anyone to upload data to your server. Because of this, we recommend that you do not have such a simple file uploader available to the general public. Otherwise, you might find that your server is filled with junk or that your server's security has been compromised.
We hope you enjoyed learning about how to work with uploading files with PHP. In the near future we will be adding an advanced lesson that will include more security and additional features!
"PHP Files "
Manipulating files is a basic necessity for serious
programmers and PHP gives you a great deal of tools for creating, uploading,
and editing files.
This section of the PHP tutorial is
completely dedicated to how PHP can interact with files. After completing this
section you should have a solid understanding of all types of file manipulation
in PHP!
PHP - Files: Be Careful
When you are manipulating files you
must be very careful because you can do a lot of damage if you do something
wrong. Common errors include editing the wrong file, filling a hard-drive with
garbage data, and accidentally deleting a file's contents.
It is our hope that you will be able
to avoid these and other slipups after reading this tutorial. However, we know
that there are so many places where code can take a wrong turn, so we urge you
to take extra care when dealing with files in PHP.
PHP - Files: Overview
The presentation of the file lessons
will begin with how to create, open, and close a file. After establishing those
basics, we will then cover other important file tasks, such as: read, write,
append, truncate, and uploading files with PHP.
PHP - File Create
Before you can do anything with a file it has to exist! In this lesson you will learn how to create a file using PHP.PHP - Creating Confusion
In PHP, a file is created using a command that is also used to open files. It may seem a little confusing, but we'll try to clarify this conundrum.In PHP the fopen function is used to open files. However, it can also create a file if it does not find the file specified in the function call. So if you use fopen on a file that does not exist, it will create it, given that you open the file for writing or appending (more on this later).
PHP - How to Create a File
The fopen function needs two important pieces of information to operate correctly. First, we must supply it with the name of the file that we want it to open. Secondly, we must tell the function what we plan on doing with that file (i.e. read from the file, write information, etc).Since we want to create a file, we must supply a file name and tell PHP that we want to write to the file. Note: We have to tell PHP we are writing to the file, otherwise it will not create a new file.
PHP Code:
$ourFileName = "testFile.txt";
$ourFileHandle = fopen($ourFileName, 'w') or die("can't open file");
fclose($ourFileHandle);The file "testFile.txt" should be created in the same directory where this PHP code resides. PHP will see that "testFile.txt" does not exist and will create it after running this code. There's a lot of information in those three lines of code, let's make sure you understand it.
- $ourFileName = "testFile.txt";
Here we create the name of our file,
"testFile.txt" and store it into a PHP String variable $ourFileName.
- $ourFileHandle = fopen($ourFileName, 'w') or die("can't open file");
This bit of code actually has two parts. First we
use the function fopen and give it two arguments: our file name and we
inform PHP that we want to write by passing the character "w".
Second, the fopen function returns what is
called a file handle, which will allow us to manipulate the file. We
save the file handle into the $ourFileHandle variable. We will talk more
about file handles later on.
- fclose($ourFileHandle);
We close the file that was opened. fclose
takes the file handle that is to be closed. We will talk more about this more
in the file closing lesson.
PHP - Permissions
If you are trying to get this program to run and you are having errors, you might want to check that you have granted your PHP file access to write information to the hard drive. Setting permissions is most often done with the use of an FTP program to execute a command called CHMOD. Use CHMOD to allow the PHP file to write to disk, thus allowing it to create a file.In the near future Tizag.com will have a more in-depth tutorial on how to use CHMOD to set file permissions.
PHP - File Open
In the previous lesson we used the function fopen to create a new file. In this lesson we will be going into the details of this important function and see what it has to offer.PHP - Different Ways to Open a File
For many different technical reasons, PHP requires you to specify your intentions when you open a file. Below are the three basic ways to open a file and the corresponding character that PHP uses.- Read: 'r'
- Write: 'w'
- Append: 'a'
A file pointer is PHP's way of remembering its location in a file. When you open a file for reading, the file pointer begins at the start of the file. This makes sense because you will usually be reading data from the front of the file.
However, when you open a file for appending, the file pointer is at the end of the file, as you most likely will be appending data at the end of the file. When you use reading or writing functions they begin at the location specified by the file pointer.
PHP - Explanation of Different Types of fopen
These three basic ways to open a file have distinct purposes. If you want to get information out of a file, like search an e-book for the occurrences of "cheese", then you would open the file for read only.If you wanted to write a new file, or overwrite an existing file, then you would want to open the file with the "w" option. This would wipe clean all existing data within the file.
If you wanted to add the latest order to your "orders.txt" file, then you would want to open it to append the data on to the end. This would be the "a" option.
PHP - File Open: Advanced
There are additional ways to open a file. Above we stated the standard ways to open a file. However, you can open a file in such a way that reading and writing is allowable! This combination is done by placing a plus sign "+" after the file mode character.- Read/Write: 'r+'
- Write/Read: 'w+'
- Append: 'a+'
PHP - File Open: Cookie Cutter
Below is the correct form for opening a file with PHP. Replace the (X) with one of the options above (i.e. r, w, a, etc).Pseudo PHP Code:
$ourFileName = "testFile.txt";
$fh = fopen($ourFileName, 'X') or die("Can't open file");
fclose($fh);
PHP - File Open: Summary
You can open a file in many different ways. You can delete everything and begin writing on a clean slate, you can add to existing data, and you can simply read information from a file. In later lessons we will go into greater detail on how each of these different ways to open a file is used in the real world and give some helpful examples.PHP - File Close
The next logical step after you have opened a file and finished your business with it is to close that file down. You don't want an open file running around on your server taking up resources and causing mischief!PHP - File Close Description
In PHP it is not system critical to close all your files after using them because the server will close all files after the PHP code finishes execution. However the programmer is still free to make mistakes (i.e. editing a file that you accidentally forgot to close). You should close all files after you have finished with them because it's a good programming practice and because we told you to!PHP - File Close Function
In a previous tutorial, we had a call to the function fclose to close down a file after we were done with it. Here we will repeat that example and discuss the importance of closing a file.PHP Code:
$ourFileName = "testFile.txt";
$ourFileHandle = fopen($ourFileName, 'w') or die("can't open file");
fclose($ourFileHandle);The function fclose requires the file handle that we want to close down. In our example we set our variable "$fileHandle" equal to the file handle returned by the fopen function.
After a file has been closed down with fclose it is impossible to read, write or append to that file unless it is once more opened up with the fopen function.
PHP - File Write
Now that you know how to open and close a file, lets get on to the most useful part of file manipulation, writing! There is really only one main function that is used to write and it's logically called fwrite.PHP - File Open: Write
Before we can write information to our test file we have to use the function fopen to open the file for writing.PHP Code:
$myFile = "testFile.txt";
$fh = fopen($myFile, 'w');
PHP - File Write: fwrite Function
We can use php to write to a text file. The fwrite function allows data to be written to any type of file. Fwrite's first parameter is the file handle and its second parameter is the string of data that is to be written. Just give the function those two bits of information and you're good to go!Below we are writing a couple of names into our test file testFile.txt and separating them with a carriaged return.
PHP Code:
$myFile = "testFile.txt";
$fh = fopen($myFile, 'w') or die("can't open file");
$stringData = "Bobby Bopper\n";
fwrite($fh, $stringData);
$stringData = "Tracy Tanner\n";
fwrite($fh, $stringData);
fclose($fh);The $fh variable contains the file handle for testFile.txt. The file handle knows the current file pointer, which for writing, starts out at the beginning of the file.
We wrote to the file testFile.txt twice. Each time we wrote to the file we sent the string $stringData that first contained Bobby Bopper and second contained Tracy Tanner. After we finished writing we closed the file using the fclose function.
If you were to open the testFile.txt file in NOTEPAD it would look like this:
Contents of the testFile.txt File:
Bobby Bopper
Tracy Tanner
Tracy Tanner
PHP - File Write: Overwriting
Now that testFile.txt contains some data we can demonstrate what happens when you open an existing file for writing. All the data contained in the file is wiped clean and you start with an empty file. In this example we open our existing file testFile.txt and write some new data into it.PHP Code:
$myFile = "testFile.txt";
$fh = fopen($myFile, 'w') or die("can't open file");
$stringData = "Floppy Jalopy\n";
fwrite($fh, $stringData);
$stringData = "Pointy Pinto\n";
fwrite($fh, $stringData);
fclose($fh);If you now open the testFile.txt file you will see that Bobby and Tracy have both vanished, as we expected, and only the data we just wrote is present.
Contents of the testFile.txt File:
Floppy Jalopy
Pointy Pinto
In the next lesson we will show you how to get information out of a file by
using PHP's read data functions!Pointy Pinto
PHP - File Read
My apologies for taking so long to actually get to the point where you get information from files. In this lesson we will teach you how to read data from a file using various PHP functions.PHP - File Open: Read
Before we can read information from a file we have to use the function fopen to open the file for reading. Here's the code to read-open the file we created in the PHP File Write lessons.PHP Code:
$myFile = "testFile.txt";
$fh = fopen($myFile, 'r');The file we created in the last lesson was named "testFile.txt". Your PHP script that you are writing should reside in the same directory as "text.txt". Here are the contents of our file from File Write.
testFile.txt Contents:
Floppy Jalopy
Pointy Pinto
Now that the file is open, with read permissions enabled, we can get
started!Pointy Pinto
PHP - File Read: fread Function
The fread function is the staple for getting data out of a file. The function requires a file handle, which we have, and an integer to tell the function how much data, in bytes, it is supposed to read.One character is equal to one byte. If you wanted to read the first five characters then you would use five as the integer.
PHP Code:
$myFile = "testFile.txt";
$fh = fopen($myFile, 'r');
$theData = fread($fh, 5);
fclose($fh);
echo $theData;
Display:
Flopp
The first five characters from the testFile.txt file are now stored
inside $theData. You could echo this string, $theData, or write
it to another file.If you wanted to read all the data from the file, then you need to get the size of the file. The filesize function returns the length of a file, in bytes, which is just what we need! The filesize function requires the name of the file that is to be sized up.
PHP Code:
$myFile = "testFile.txt";
$fh = fopen($myFile, 'r');
$theData = fread($fh, filesize($myFile));
fclose($fh);
echo $theData;
Display:
Floppy Jalopy Pointy Pinto
Note: It is all on one line because our "testFile.txt" file did
not have a <br /> tag to create an HTML line break. Now the entire
contents of the testFile.txt file is stored in the string variable $theData.PHP - File Read: gets Function
PHP also lets you read a line of data at a time from a file with the gets function. This can or cannot be useful to you, the programmer. If you had separated your data with new lines then you could read in one segment of data at a time with the gets function.Lucky for us our "testFile.txt" file is separated by new lines and we can utilize this function.
PHP Code:
$myFile = "testFile.txt";
$fh = fopen($myFile, 'r');
$theData = fgets($fh);
fclose($fh);
echo $theData;
testFile.txt Contents:
Floppy Jalopy
The fgets function searches for the first occurrence of
"\n" the newline character. If you did not write newline characters
to your file as we have done in File Write, then this
function might not work the way you expect it to.PHP - File Delete
You know how to create a file. You know how to open a file in an assortment of different ways. You even know how to read and write data from a file!Now it's time to learn how to destroy (delete) files. In PHP you delete files by calling the unlink function.
PHP - File Unlink
When you view the contents of a directory you can see all the files that exist in that directory because the operating system or application that you are using displays a list of filenames. You can think of these filenames as links that join the files to the directory you are currently viewing.If you unlink a file, you are effectively causing the system to forget about it or delete it!
Before you can delete (unlink) a file, you must first be sure that it is not open in your program. Use the fclose function to close down an open file.
PHP - Unlink Function
Remember from the PHP File Create lesson that we created a file named testFile.txt.PHP Code:
$myFile = "testFile.txt";
$fh = fopen($myFile, 'w') or die("can't open file");
fclose($fh);Now to delete testFile.txt we simply run a PHP script that is located in the same directory. Unlink just needs to know the name of the file to start working its destructive magic.
PHP Code:
$myFile = "testFile.txt";
unlink($myFile);The testFile.txt should now be removed.
PHP - Unlink: Safety First!
With great power comes a slough of potential things you can mess up! When you are performing the unlink function be sure that you are deleting the right file!PHP - File Append
So far we have learned how to open, close, read, and write to a file. However, the ways in which we have written to a file so far have caused the data that was stored in the file to be deleted. If you want to append to a file, that is, add on to the existing data, then you need to open the file in append mode.PHP - File Open: Append
If we want to add on to a file we need to open it up in append mode. The code below does just that.PHP Code:
$myFile = "testFile.txt";
$fh = fopen($myFile, 'a');If we were to write to the file it would begin writing data at the end of the file.
PHP - File Write: Appending Data
Using the testFile.txt file we created in the File Write lesson , we are going to append on some more data.PHP Code:
$myFile = "testFile.txt";
$fh = fopen($myFile, 'a') or die("can't open file");
$stringData = "New Stuff 1\n";
fwrite($fh, $stringData);
$stringData = "New Stuff 2\n";
fwrite($fh, $stringData);
fclose($fh);You should noticed that the way we write data to the file is exactly the same as in the Write lesson. The only thing that is different is that the file pointer is placed at the end of the file in append mode, so all data is added to the end of the file.
The contents of the file testFile.txt would now look like this:
Contents of the testFile.txt File:
Floppy Jalopy
Pointy Pinto
New Stuff 1
New Stuff 2
Pointy Pinto
New Stuff 1
New Stuff 2
PHP - Append: Why Use It?
The above example may not seem very useful, but appending data onto a file is actually used everyday. Almost all web servers have a log of some sort. These various logs keep track of all kinds of information, such as: errors, visitors, and even files that are installed on the machine.A log is basically used to document events that occur over a period of time, rather than all at once. Logs: a perfect use for append!
PHP - File Truncate
As we have mentioned before, when you open a file for writing with the paramater 'w' it completely wipes all data from that file. This action is also referred to as "truncating" a file. Truncate literally means to shorten.PHP - File Open: Truncate
To erase all the data from our testFile.txt file we need to open the file for normal writing. All existing data within testFile.txt will be lost.PHP Code:
$myFile = "testFile.txt";
$fh = fopen($myFile, 'w');
fclose($fh);
PHP - Truncate: Why Use It?
Truncating is most often used on files that contain data that will only be used for a short time, before needing to be replaced. These type of files are most often referred to as temporary files.For example, you could create an online word processor that automatically saves every thirty seconds. Every time it saves it would take all the data that existed within some HTML form text box and save it to the server. This file, say tempSave.txt, would be truncated and overwritten with new, up-to-date data every thirty seconds.This might not be the most efficient program, but it is a nice usage of truncate.PHP - File Upload
A very useful aspect of PHP is its ability to manage file uploads to your server. Allowing users to upload a file to your server opens a whole can of worms, so please be careful when enabling file uploads.PHP - File Upload: HTML Form
Before you can use PHP to manage your uploads, you must first build an HTML form that lets users select a file to upload. See our HTML Form lesson for a more in-depth look at forms.HTML Code:
<form enctype="multipart/form-data" action="uploader.php" method="POST">
<input type="hidden" name="MAX_FILE_SIZE" value="100000" />
Choose a file to upload: <input name="uploadedfile" type="file" /><br />
<input type="submit" value="Upload File" />
</form>Here is a brief description of the important parts of the above code:
- enctype="multipart/form-data" - Necessary for our to-be-created PHP file to function properly.
- action="uploader.php" - The name of our PHP page that will be created, shortly.
- method="POST" - Informs the browser that we want to send information to the server using POST.
- input type="hidden" name="MA... - Sets the maximum allowable file size, in bytes, that can be uploaded. This safety mechanism is easily bypassed and we will show a solid backup solution in PHP. We have set the max file size to 100KB in this example.
- input name="uploadedfile" - uploadedfile is how we will access the file in our PHP script.
Display:
After the user clicks submit, the data will be posted to the server and the user will be redirected to uploader.php. This PHP file is going to process the form data and do all the work.PHP - File Upload: What's the PHP Going to Do?
Now that we have the right HTML form we can begin to code the PHP script that is going to handle our uploads. Typically, the PHP file should make a key decision with all uploads: keep the file or throw it away. A file might be thrown away from many reasons, including:- The file is too large and you do not want to have it on your server.
- You wanted the person to upload a picture and they uploaded something else, like an executable file (.exe).
- There were problems uploading the file and so you can't keep it.
PHP - File Upload: uploader.php
When the uploader.php file is executed, the uploaded file exists in a temporary storage area on the server. If the file is not moved to a different location it will be destroyed! To save our precious file we are going to need to make use of the $_FILES associative array.The $_FILES array is where PHP stores all the information about files. There are two elements of this array that we will need to understand for this example.
- uploadedfile - uploadedfile is the reference we assigned in our HTML form. We will need this to tell the $_FILES array which file we want to play around with.
- $_FILES['uploadedfile']['name'] - name contains the original path of the user uploaded file.
- $_FILES['uploadedfile']['tmp_name'] - tmp_name contains the path to the temporary file that resides on the server. The file should exist on the server in a temporary directory with a temporary name.
PHP Code:
// Where the file is going to be placed
$target_path = "uploads/";
/* Add the original filename to our target path.
Result is "uploads/filename.extension" */
$target_path = $target_path . basename( $_FILES['uploadedfile']['name']);NOTE: You will need to create a new directory in the directory where uploader.php resides, called "uploads", as we are going to be saving files there.
We now have all we need to successfully save our file to the server. $target_path contains the path where we want to save our file to.
PHP - File Upload: move_uploaded_file Function
Now all we have to do is call the move_uploaded_file function and let PHP do its magic. The move_uploaded_file function needs to know 1) The path of the temporary file (check!) 2) The path where it is to be moved to (check!).PHP Code:
$target_path = "uploads/";
$target_path = $target_path . basename( $_FILES['uploadedfile']['name']);
if(move_uploaded_file($_FILES['uploadedfile']['tmp_name'], $target_path)) {
echo "The file ". basename( $_FILES['uploadedfile']['name']).
" has been uploaded";
} else{
echo "There was an error uploading the file, please try again!";
}If the upload is successful, then you will see the text "The file filename has been uploaded". This is because move_uploaded_file returns true if the file was moved, and false if it had a problem.
If there was a problem then the error message "There was an error uploading the file, please try again!" would be displayed.
PHP - File Upload: Safe Practices!
Note: This script is for education purposes only. We do not recommend placing this on a web page viewable to the public.These few lines of code we have given you will allow anyone to upload data to your server. Because of this, we recommend that you do not have such a simple file uploader available to the general public. Otherwise, you might find that your server is filled with junk or that your server's security has been compromised.
We hope you enjoyed learning about how to work with uploading files with PHP. In the near future we will be adding an advanced lesson that will include more security and additional features!
PHP STRING"S
PHP - String Position - strpos>>>
Being able to manipulate strings is
a valuable skill, especially in PHP. You'll most likely come across a
programming problem that requires you to find some data in a string. The
beginning of a lot of your string manipulation expertise will begin with the strpos
function, which allows you to find data in your string.
Searching a String with strpos
The way strpos works is it takes some string you want to search in as its first argument and another string, which is what you are actually searching for, as the second argument. If the function can find a search match, then it will return the position of the first match. However, if it can't find a match it will return false.To make this function crystal clear, lets search a numbered, in-order string, for the number five.
PHP Code:
$numberedString = "1234567890"; // 10 numbers from 1 to 0
$fivePos = strpos($numberedString, "5");
echo "The position of 5 in our string was $fivePos";
Display:
The position of 5 in our string was 4
Notice that the position is 4, which may seem confusing at first, until you
realize that PHP starts counting from 0.- The number 1 - Position 0 - No match
- The number 2 - Position 1 - No match
- The number 3 - Position 2 - No match
- The number 4 - Position 3 - No match
- The number 5 - Position 4 - Match
Finding All Occurrences in a String with Offset
One of the limitations of strpos is that it only returns the position of the very first match. If there are 5,000 other matches in the string you would be none the wiser, unless you take action!There is a third (optional) argument to strpos that will let you specify where to begin your search of the string. If you were to store the position of the last match and use that + 1 as an offset, you would skip over the first match and be find the next one.
PHP Code:
$numberedString = "1234567890123456789012345678901234567890";
$fivePos = strpos($numberedString, "5");
echo "The position of 5 in our string was $fivePos";
$fivePos2 = strpos($numberedString, "5", $fivePos + 1);
echo "<br />The position of the second 5 was $fivePos2";
Display:
The position of 5 in our string was 4
The position of the second 5 was 14
By taking the first match's position of 4 and adding 1 we then asked strpos
to begin searching after the last match. The string it was actually searching
after computing the offset was: 6789012345... Letting us find the second
5 in the string.The position of the second 5 was 14
If we use our knowledge of PHP While Loops we can find every single 5 in our string numberedString with just a few lines of code.
PHP Code:
$numberedString = "1234567890123456789012345678901234567890";
$offset = 0; // initial offset is 0
$fiveCounter = 0;
// First check if there is a "5" at position 0.
if(strpos($numberedString, "5") == 0){
$fiveCounter++;
echo "<br />Five #$fiveCounter is at position - 0";
}
// Check the rest of the string for 5's
while($offset = strpos($numberedString, "5", $offset + 1)){
$fiveCounter++;
echo "<br />Five #$fiveCounter is at position - $offset";
}
Display:
Five #1 is at position - 4
Five #2 is at position - 14
Five #3 is at position - 24
Five #4 is at position - 34
That conditional statement in our while loop may look a little intimidating,
but not if you break it down.Five #2 is at position - 14
Five #3 is at position - 24
Five #4 is at position - 34
- $offset = strpos($numberedString, "5", $offset + 1) - This is our conditional statement for our PHP While Loop. If this ever is false the while loop will stop running. This conditional statement always runs before each pass through the while loop.
- strpos($numberedString, "5", $offset + 1) - This is the same code we used in a previous example. We are going to search our string numberedString for the number 5 and use the last match's value (stored in $offset) + 1 to skip over the last match. The first $offset we use has a value of 0, so that we start at the beginning of the string.
- $offset = strpos(... We are going to store the location returned by strpos into $offset so that we can skip this match the next time the while loop runs through the code. If strpos ever fails to find a match then this will be set to false making our while loop stop executing.
PHP str_replace Function
Another key tool to have in your programming toolbox is the ability to quickly replace parts of a PHP string with new values. The str_replace function is similar to a word processor's "Replace All" command that lets you specify a word and what to replace it with, then replaces every occurrence of that word in the document.str_replace Parameters
str_replace has three parameters that are required for the function to work properly. str_replace(search, replace, originalString).- search - This is what you want to search your string for. This can be a string or an array.
- replace - All matches for search will be replaced with this value. This can be a string or an array.
- originalString - This is what search and replace will be operating on. The str_replace function will return a modified version of originalString when it completes.
str_replace Simple Example
Imagine we are working at a school district and need to create a webpage for the students' parents. The webpage has an introduction string that we need to customize depending on if the student is male or female. With str_replace this is mighty easy.PHP Code:
//string that needs to be customized
$rawstring = "Welcome Birmingham parents. Your replaceme is a pleasure to have!";
//male string
$malestr = str_replace("replaceme", "son", $rawstring);
//female string
$femalestr = str_replace("replaceme", "daughter", $rawstring);
echo "Son: ". $malestr . "<br />";
echo "Daughter: ". $femalestr;
Display:
Son: Welcome Birmingham parents. Your son is a pleasure to
have!
Daughter: Welcome Birmingham parents. Your daughter is a pleasure to have!
With these two gender customized strings created we could then provide a
more engaging experience for the student's parents when they logged into the
school website with their kid's credentials.Daughter: Welcome Birmingham parents. Your daughter is a pleasure to have!
str_replace Arrays: Multiple Replaces in One
In the last example we only needed to replace one word replaceme in our string, but what if we wanted to replace many words? We could just use the function multiple times to get the job done, or we could create an array of placeholders and a second array of replace values to get it all done in one function call.The key thing to understand with this technique is that you are creating two arrays that will be used to swap values. The first item in placeholders will be replaced by the first item in the replace values, the second item of placeholders replaced with the second in replace values and so on and so forth.
Let's extend our simple example to be a complete form letter addressed to a student's parents.
PHP Code:
//string that needs to be customized
$rawstring = "Welcome Birmingham parent! <br />
Your offspring is a pleasure to have!
We believe pronoun is learning a lot.<br />
The faculty simple adores pronoun2 and you can often hear
them say \"Attah sex!\"<br />";
//placeholders array
$placeholders = array('offspring', 'pronoun', 'pronoun2', 'sex');
//male replace values array
$malevals = array('son', 'he', 'him', 'boy');
//female replace values array
$femalevals = array('daughter', 'she', 'her', 'girl');
//male string
$malestr = str_replace($placeholders, $malevals, $rawstring);
//female string
$femalestr = str_replace($placeholders, $femalevals, $rawstring);
echo "Son: ". $malestr . "<br />";
echo "Daughter: ". $femalestr;
Display:
Son: Welcome Birmingham parent!
Your son is a pleasure to have! We believe he is learning a lot.
The faculty simple adores he2 and you can often hear them say "Attah boy!"
Daughter: Welcome Birmingham parent!
Your daughter is a pleasure to have! We believe she is learning a lot.
The faculty simple adores she2 and you can often hear them say "Attah girl!"
Notice: there is a bug in this code. The placeholder pronoun2
did not get replaced in the way we intended (our strings have he2 and she2
instead of him and her). This is because all instances of pronoun were
replaced first and the pronoun in pronoun2 was replaced at this time with he or
she, making he2 or she2. When it was pronoun2's turn to be replaced,
there were no matches to be found, so our string has no him or her.Your son is a pleasure to have! We believe he is learning a lot.
The faculty simple adores he2 and you can often hear them say "Attah boy!"
Daughter: Welcome Birmingham parent!
Your daughter is a pleasure to have! We believe she is learning a lot.
The faculty simple adores she2 and you can often hear them say "Attah girl!"
To fix this bug you could simply make sure that pronoun2 comes first in the placeholders array and by updating the values of the male and female replace values to reflect this.
PHP Code:
// ...snip
//placeholders array
$placeholders = array('offspring', 'pronoun2', 'pronoun', 'sex');
//male replace values array
$malevals = array('son', 'him', 'he', 'boy');
//female replace values array
$femalevals = array('daughter', 'her', 'she', 'girl');
//snip...
Display:
Son: Welcome Birmingham parent!
Your son is a pleasure to have! We believe he is learning a lot.
The faculty simple adores him and you can often hear them say "Attah boy!"
Daughter: Welcome Birmingham parent!
Your daughter is a pleasure to have! We believe she is learning a lot.
The faculty simple adores her and you can often hear them say "Attah girl!"
PHP substr_replace Function
The function substr_replace introduces some additional functionality to compliment str_replace. substr_replace is a more mathematically based replace function, which relies on starting points and lengths to replace parts of strings, as opposed to searching and replacing.substr_replace's Four Parameters
There are three required parameters for the substr_replace function (original string, replacement string, starting point) and one that's optional (length).- original string - This is your original string that will be operated on.
- replacement string - This string will be used to replace everything in the string from the starting point to the ending point (specified by length).
- starting point - This is the place in the original string that will be used to mark the replacement's beginning. A negative value specifies the number of characters from the end of the string.
- optional length - How many characters from the original string will be replaced. If no length is specified then the end of the string is used. If a value of 0 is used then no characters will be replaced and an insert is performed. A negative value specifies the number of characters from the end of the string.
substr_replace On Your Mark
This example of substr_replace shows what happens when you omit the length parameter at various starting points.PHP Code:
//string that needs to be customized
$original = "ABC123 Hello Mr. Cow! DEF321";
//starting point 5
$sp5 = substr_replace($original, "Five", 5);
//starting point 12
$sp12 = substr_replace($original, "Twelve", 12);
//starting point 0
$sp0 = substr_replace($original, "Zero", 0);
//starting point -1
$spneg1 = substr_replace($original, "Negative 1", -1);
//Echo each string
echo "Original String: $original <br />";
echo "Starting Point 5: $sp5 <br />";
echo "Starting Point 12: $sp12 <br />";
echo "Starting Point 0: $sp0 <br />";
echo "Starting Point -1: $spneg1 ";
Display:
Original String: ABC123 Hello Mr. Cow! DEF321
Starting Point 5: ABC12Five
Starting Point 12: ABC123 HelloTwelve
Starting Point 0: Zero
Starting Point -1: ABC123 Hello Mr. Cow! DEF32Negative 1
As you can see, when you don't specify the fourth parameter, length,
everything after the starting point is replaced by the second parameter replacement
string.Starting Point 5: ABC12Five
Starting Point 12: ABC123 HelloTwelve
Starting Point 0: Zero
Starting Point -1: ABC123 Hello Mr. Cow! DEF32Negative 1
Note: The first replacement occurred at position 5, which in $original was the character 3. This 3 and everything onward was replaced with the replacement string. Remember that you start counting character to begin from zero. The $original string could be labeled as so:
- Letter A - Position 0
- Letter B - Position 1
- Letter C - Position 2
- Letter 1 - Position 3
- Letter 2 - Position 4
- Letter 3 - Position 5
substr_replace Specifying a Length
If you want to get any sort of precision out of this function you're going to have to get into the nitty gritty of specifying the exact length of characters you want replaced in your original string.Imagine that you want to get rid of those ugly pseudo references (ABC123, DEF321) at the beginning and end of the string. Since both of those strings are a length of 6 and we know one is at the very beginning of the string and the other is at the very end of the string we should probably use a starting point of 0 for ABC123 and a value of -6 for DEF321. By having a replacement string of nothing "" we can do something similar to select and delete that we often do in a word processor.
PHP Code:
//string that needs to be customized
$original = "ABC123 Hello Mr. Cow! DEF321";
//remove ABC123 and store in $cleanedstr
$cleanedstr = substr_replace($original, "", 0, 6);
//remove DEF321 from $cleanedstr
$cleanedstr2 = substr_replace($cleanedstr, "", -6, 6);
//Echo each string
echo "Original String: $original <br />";
echo "Clean #1: $cleanedstr <br />";
echo "Clean #2: $cleanedstr2";
Display:
Original String: ABC123 Hello Mr. Cow! DEF321
Clean #1: Hello Mr. Cow! DEF321
Clean #2: Hello Mr. Cow!
Make sure that you play around with this function some on your own so you
can get a feel for how the starting point and length parameters
effect this function.Clean #1: Hello Mr. Cow! DEF321
Clean #2: Hello Mr. Cow!
substr_replace Perform an Insert
By setting the length parameter to zero you can stop substr_replace from removing anything from the original string and just add to it. If we wanted to add a second and third person to our $original string we would want to do this insert operation. Note: instead of counting the characters we've used a couple other PHP functions to figure out the starting positions for us.PHP Code:
//string that needs to be customized
$original = "Hello Mr. Cow!";
// Get the position of Mr. Cow
$cowpos = strpos($original, "Mr. Cow");
// Find where Mr. Cow ends by adding the length of Mr. Cow
$cowpos_end = $cowpos + strlen("Mr. Cow");
// Insert Mrs. Bear after Mr. Cow
$mrsbear = substr_replace($original, " and Mrs. Bear", $cowpos_end, 0);
// Insert Sensei Shark before Mr. Cow
$senseishark = substr_replace($mrsbear, "Sensei Shark, ", $cowpos, 0);
//Echo each string
echo "Original String: $original <br />";
echo "After Mrs. Bear: $mrsbear <br />";
echo "After Sensei Shark: $senseishark";
Display:
Original String: Hello Mr. Cow!
After Mrs. Bear: Hello Mr. Cow and Mrs. Bear!
After Sensei Shark: Hello Sensei Shark, Mr. Cow and Mrs. Bear!
We snuck a new function strlen into that example, but it isn't that
complicated of a function, as it stands for "string length."After Mrs. Bear: Hello Mr. Cow and Mrs. Bear!
After Sensei Shark: Hello Sensei Shark, Mr. Cow and Mrs. Bear!
- $cowpos_end = $cowpos + strlen("Mr. Cow");
PHP - String Capitalization Functions
If you've ever wanted to manipulate the capitalization of your PHP strings, then this lesson will be quite helpful to you. PHP has three primary capitalization related functions: strtoupper, strtolower and ucwords. The function names are pretty self-explanatory, but why they are useful in programming might be new to you.Converting a String to Upper Case - strtoupper
The strtoupper function takes one argument, the string you want converted to upper case and returns the converted string. Only letters of the alphabet are changed, numbers will remain the same.PHP Code:
$originalString = "String Capitalization 1234";
$upperCase = strtoupper($originalString);
echo "Old string - $originalString <br />";
echo "New String - $upperCase";
Display:
Old string - String Capitalization 1234
New String - STRING CAPITALIZATION 1234
One might use this function to increase emphasis of a important point or in
a title. Another time it might be used with a font that looks very nice with
all caps to fit the style of the web page design.New String - STRING CAPITALIZATION 1234
A more technical reason would be to convert two strings you are comparing to see if they are equal. By converting them to the same capitalization you remove the possibility that they won't match simply because of different capitalizations.
Converting a String to Lower Case - strtolower
The strtolower function also has one argument: the string that will be converted to lower case.PHP Code:
$originalString = "String Capitalization 1234";
$lowerCase = strtolower($originalString);
echo "Old string - $originalString <br />";
echo "New String - $lowerCase";
Display:
Old string - String Capitalization 1234
New String - string capitalization 1234
New String - string capitalization 1234
Capitalizing the First Letter - ucwords
Titles of various media types often capitalize the first letter of each word and PHP has a time-saving function that will do just this.PHP Code:
$titleString = "a title that could use some hELP";
$ucTitleString = ucwords($titleString);
echo "Old title - $titleString <br />";
echo "New title - $ucTitleString";
Display:
Old title - a title that could use some hELP
New title - A Title That Could Use Some HELP
Notice that the last word "hELP" did not have the capitalization
changed on the letters that weren't first, they remained capitalized. If you
want to ensure that only the first letter is capitalized in each word of
your title, first use the strtolower function and then the ucwords
function.New title - A Title That Could Use Some HELP
PHP Code:
$titleString = "a title that could use some hELP";
$lowercaseTitle = strtolower($titleString);
$ucTitleString = ucwords($lowercaseTitle);
echo "Old title - $titleString <br />";
echo "New title - $ucTitleString";
Display:
Old title - a title that could use some hELP
New title - A Title That Could Use Some Help
New title - A Title That Could Use Some Help
PHP - String Explode
The PHP function explode lets you take a string and blow it up into smaller pieces. For example, if you had a sentence you could ask explode to use the sentence's spaces " " as dynamite and it would blow up the sentence into separate words, which would be stored in an array. The sentence "Hello, I would like to lose weight." would look like this after explode got done with it:- Hello,
- I
- would
- like
- to
- lose
- weight.
The explode Function
The first argument that explode takes is the delimiter (our dynamite) which is used to blow up the second argument, the original string. explode returns an array of string pieces from the original and they are numbered in order, starting from 0. Lets take a phone number in the form ###-###-#### and use a hyphen "-" as our dynamite to split the string into three separate chunks.PHP Code:
$rawPhoneNumber = "800-555-5555";
$phoneChunks = explode("-", $rawPhoneNumber);
echo "Raw Phone Number = $rawPhoneNumber <br />";
echo "First chunk = $phoneChunks[0]<br />";
echo "Second chunk = $phoneChunks[1]<br />";
echo "Third Chunk chunk = $phoneChunks[2]";
Display:
Raw Phone Number = 800-555-5555
First chunk = 800
Second chunk = 555
Third Chunk chunk = 5555
First chunk = 800
Second chunk = 555
Third Chunk chunk = 5555
explode Function - Setting a Limit
If you want to control the amount of destruction that explode can wreak on your original string, consider using the third (optional) argument which allows you to set the number of pieces explode can return. This means it will stop exploding once the number of pieces equals the set limit. Below we've blown up a sentence with no limit and then with a limit of 4.PHP Code:
$someWords = "Please don't blow me to pieces.";
$wordChunks = explode(" ", $someWords);
for($i = 0; $i < count($wordChunks); $i++){
echo "Piece $i = $wordChunks[$i] <br />";
}
$wordChunksLimited = explode(" ", $someWords, 4);
for($i = 0; $i < count($wordChunksLimited); $i++){
echo "Limited Piece $i = $wordChunksLimited[$i] <br />";
}
Display:
Piece 0 = Please
Piece 1 = don't
Piece 2 = blow
Piece 3 = me
Piece 4 = to
Piece 5 = pieces.
Limited Piece 0 = Please
Limited Piece 1 = don't
Limited Piece 2 = blow
Limited Piece 3 = me to pieces.
The limited explosion has 4 pieces (starting from 0, ending at 3). If you
forgot how a for loop works, check out PHP For Loops.Piece 1 = don't
Piece 2 = blow
Piece 3 = me
Piece 4 = to
Piece 5 = pieces.
Limited Piece 0 = Please
Limited Piece 1 = don't
Limited Piece 2 = blow
Limited Piece 3 = me to pieces.
PHP - Array implode
The PHP function implode operates on an array and is known as the "undo" function of explode. If you have used explode to break up a string into chunks or just have an array of stuff you can use implode to put them all into one string.PHP implode - Repairing the Damage
The first argument of implode is the string of characters you want to use to join the array pieces together. The second argument is the array (pieces).PHP Code:
$pieces = array("Hello", "World,", "I", "am", "Here!");
$gluedTogetherSpaces = implode(" ", $pieces);
$gluedTogetherDashes = implode("-", $pieces);
for($i = 0; $i < count($pieces); $i++){
echo "Piece #$i = $pieces[$i] <br />";
}
echo "Glued with Spaces = $gluedTogetherSpaces <br />";
echo "Glued with Dashes = $gluedTogetherDashes";
Display:
Piece #0 = Hello
Piece #1 = World,
Piece #2 = I
Piece #3 = am
Piece #4 = Here!
Glued with Spaces = Hello World, I am Here!
Glued with Dashes = Hello-World,-I-am-Here!
The implode function will convert the entire array into a string and
there is no optional argument to limit this as there was in the explode
function.Piece #1 = World,
Piece #2 = I
Piece #3 = am
Piece #4 = Here!
Glued with Spaces = Hello World, I am Here!
Glued with Dashes = Hello-World,-I-am-Here!
"PHP Advanced"
PHP Date Function
While PHP's date() function
may seem to have an overwhelming amount of options available, isn't it always
better to have more choices than not enough? With PHP's date function you
format timestamps, so they are more human readable.
This lesson will teach you how to display the current time, formating PHP's
timestamp, and show you all the various date arguments for reference purposes.PHP Date - The Timestamp
The date function always formats a timestamp, whether you supply one or not. What's a timestamp? Good question!- Timestamp: A timestamp is the number of seconds from January 1, 1970 at 00:00. Otherwise known as the Unix Timestamp, this measurement is a widely used standard that PHP has chosen to utilize.
What Time Is It?
The date function uses letters of the alphabet to represent various parts of a typical date and time format. The letters we will be using in our first example are:- d: The day of the month. The type of output you can expect is 01 through 31.
- m: The current month, as a number. You can expect 01 through 12.
- y: The current year in two digits ##. You can expect 00 through 99
However, other characters like a slash "/" can be inserted between the letters to add additional formatting. We have opted to use the slash in our example.
PHP Code:
<?php
echo date("m/d/y");
?>If the 2010 Winter Olympics were just finishing up, you would see something like:
Display:
02/27/10
Be sure to test this out on your own PHP enabled server, it's really great
to see the instant results available with PHP date!Supplying a Timestamp
As our first example shows, the first argument of the date function tells PHP how you would like your date and time displayed. The second argument allows for a timestamp and is optional.This example uses the mktime function to create a timestamp for tomorrow. To go one day in the future we simply add one to the day argument of mktime. For your future reference, we have the arguments of mktime.
Note: These arguments are all optional. If you do not supply any arguments the current time will be used to create the timestamp.
- mktime(hour, minute, second, month, day, year, daylight savings time)
PHP Code:
<?php
$tomorrow = mktime(0, 0, 0, date("m"), date("d")+1, date("y"));
echo "Tomorrow is ".date("m/d/y", $tomorrow);
?>Notice that we used one letter at a time with the function date to get the month, day and year. For example the date("m") will return the month's number 01-12.
If we were to run our new script just after the 2010 Winter Olympics our display would look like:
Display:
Tomorrow is 02/28/10
PHP Date - Reference
Now that you know the basics of using PHP's date function, you can easily plug in any of the following letters to format your timestamp to meet your needs.
Important Full Date and Time:
- r: Displays the full date, time and timezone offset. It is equivalent to manually entering date("D, d M Y H:i:s O")
Time:
- a: am or pm depending on the time
- A: AM or PM depending on the time
- g: Hour without leading zeroes. Values are 1 through 12.
- G: Hour in 24-hour format without leading zeroes. Values are 0 through 23.
- h: Hour with leading zeroes. Values 01 through 12.
- H: Hour in 24-hour format with leading zeroes. Values 00 through 23.
- i: Minute with leading zeroes. Values 00 through 59.
- s: Seconds with leading zeroes. Values 00 through 59.
Day:
- d: Day of the month with leading zeroes. Values are 01 through 31.
- j: Day of the month without leading zeroes. Values 1 through 31
- D: Day of the week abbreviations. Sun through Sat
- l: Day of the week. Values Sunday through Saturday
- w: Day of the week without leading zeroes. Values 0 through 6.
- z: Day of the year without leading zeroes. Values 0 through 365.
Month:
- m: Month number with leading zeroes. Values 01 through 12
- n: Month number without leading zeroes. Values 1 through 12
- M: Abbreviation for the month. Values Jan through Dec
- F: Normal month representation. Values January through December.
- t: The number of days in the month. Values 28 through 31.
Year:
- L: 1 if it's a leap year and 0 if it isn't.
- Y: A four digit year format
- y: A two digit year format. Values 00 through 99.
Other
Formatting:
- U: The number of seconds since the Unix Epoch (January 1, 1970)
- O: This represents the Timezone offset, which is the difference from Greenwich Meridian Time (GMT). 100 = 1 hour, -600 = -6 hours
PHP Sessions - Why Use Them?
As a website becomes more sophisticated, so must the code that backs it. When you get to a stage where your website need to pass along user data from one page to another, it might be time to start thinking about using PHP sessions.A normal HTML website will not pass data from one page to another. In other words, all information is forgotten when a new page is loaded. This makes it quite a problem for tasks like a shopping cart, which requires data(the user's selected product) to be remembered from one page to the next.
PHP Sessions - Overview
A PHP session solves this problem by allowing you to store user information on the server for later use (i.e. username, shopping cart items, etc). However, this session information is temporary and is usually deleted very quickly after the user has left the website that uses sessions.It is important to ponder if the sessions' temporary storage is applicable to your website. If you require a more permanent storage you will need to find another solution, like a MySQL database.
Sessions work by creating a unique identification(UID) number for each visitor and storing variables based on this ID. This helps to prevent two users' data from getting confused with one another when visiting the same webpage.
Note:If you are not experienced with session programming it is not recommended that you use sessions on a website that requires high-security, as there are security holes that take some advanced techniques to plug.
Starting a PHP Session
Before you can begin storing user information in your PHP session, you must first start the session. When you start a session, it must be at the very beginning of your code, before any HTML or text is sent.Below is a simple script that you should place at the beginning of your PHP code to start up a PHP session.
PHP Code:
<?php
session_start(); // start up your PHP session!
?>This tiny piece of code will register the user's session with the server, allow you to start saving user information and assign a UID (unique identification number) for that user's session.
Storing a Session Variable
When you want to store user data in a session use the $_SESSION associative array. This is where you both store and retrieve session data. In previous versions of PHP there were other ways to perform this store operation, but it has been updated and this is the correct way to do it.PHP Code:
<?php
session_start();
$_SESSION['views'] = 1; // store session data
echo "Pageviews = ". $_SESSION['views']; //retrieve data
?>
Display:
Pageviews = 1
In this example we learned how to store a variable to the session
associative array $_SESSION and also how to retrieve data from that same array.PHP Sessions: Using PHP's isset Function
Now that you are able to store and retrieve data from the $_SESSION array, we can explore some of the real functionality of sessions. When you create a variable and store it in a session, you probably want to use it in the future. However, before you use a session variable it is necessary that you check to see if it exists already!This is where PHP's isset function comes in handy. isset is a function that takes any variable you want to use and checks to see if it has been set. That is, it has already been assigned a value.
With our previous example, we can create a very simple pageview counter by using isset to check if the pageview variable has already been created. If it has we can increment our counter. If it doesn't exist we can create a pageview counter and set it to one. Here is the code to get this job done:
PHP Code:
<?php
session_start();
if(isset($_SESSION['views']))
$_SESSION['views'] = $_SESSION['views']+ 1;
else
$_SESSION['views'] = 1;
echo "views = ". $_SESSION['views'];
?>The first time you run this script on a freshly opened browser the if statement will fail because no session variable views would have been stored yet. However, if you were to refresh the page the if statement would be true and the counter would increment by one. Each time you reran this script you would see an increase in view by one.
Cleaning and Destroying your Session
Although a session's data is temporary and does not require that you explicitly clean after yourself, you may wish to delete some data for your various tasks.Imagine that you were running an online business and a user used your website to buy your goods. The user has just completed a transaction on your website and you now want to remove everything from their shopping cart.
PHP Code:
<?php
session_start();
if(isset($_SESSION['cart']))
unset($_SESSION['cart']);
?>You can also completely destroy the session entirely by calling the session_destroy function.
PHP Code:
<?php
session_start();
session_destroy();
?>Destroy will reset your session, so don't call that function unless you are entirely comfortable losing all your stored session data!
PHP Cookies - Background
Cookies have been around for quite some time on the internet. They were invented to allow webmaster's to store information about the user and their visit on the user's computer.At first they were feared by the general public because it was believed they were a serious privacy risk. Nowadays nearly everyone has cookies enabled on their browser, partly because there are worse things to worry about and partly because all of the "trustworthy" websites now use cookies.
This lesson will teach you the basics of storing a cookie and retrieving a cookie, as well as explaining the various options you can set with your cookie.
Creating Your First PHP Cookie
When you create a cookie, using the function setcookie, you must specify three arguments. These arguments are setcookie(name, value, expiration):- name: The name of your cookie. You will use this name to later retrieve your cookie, so don't forget it!
- value: The value that is stored in your cookie. Common values are username(string) and last visit(date).
- expiration: The date when the cookie will expire and be deleted. If you do not set this expiration date, then it will be treated as a session cookie and be removed when the browser is restarted.
PHP Code:
<?php
//Calculate 60 days in the future
//seconds * minutes * hours * days + current time
$inTwoMonths = 60 * 60 * 24 * 60 + time();
setcookie('lastVisit', date("G:i - m/d/y"), $inTwoMonths);
?>Don't worry if you can't follow the somewhat involved date calculations in this example. The important part is that you know how to set a cookie, by specifying the three important arguments: name, value and expiration date.
Retrieving Your Fresh Cookie
If your cookie hasn't expired yet, let's retrieve it from the user's PC using the aptly named $_COOKIE associative array. The name of your stored cookie is the key and will let you retrieve your stored cookie value!PHP Code:
<?php
if(isset($_COOKIE['lastVisit']))
$visit = $_COOKIE['lastVisit'];
else
echo "You've got some stale cookies!";
echo "Your last visit was - ". $visit;
?>This handy script first uses the isset function to be sure that our "lastVisit" cookie still exists on the user's PC, if it does, then the user's last visit is displayed. If the user visited our site on February 28, 2008 it might look something like this:
Display:
Your last visit was - 11:48 - 02/28/08


0 comments:
Post a Comment